
Using a VPN on your vSeebox is a great way to enhance your online security and privacy, while also giving you access to a world of content. This is probably the first or second most question that I receive from customers. While a VPN is not necessary to use the vSeeBox, it is HIGHLY recommended.
For more information on what a VPN is and why vSeeBox users need one, click HERE:
Here is a simple-to-follow guide that will get you set up in under 15 minutes.
Step 1: Choose a Trusted VPN Provider
Before downloading any VPN app, it’s important to choose a reliable and trusted VPN provider. Below are the two I recommend as they are both trusted and provide some of the best service.
NordVPN (Top Choice)
Step 2: Sign Up for the VPN Service
Once you’ve chosen your VPN provider, you’ll need to sign up for an account. Here’s how you can do it:
- Visit the VPN Provider’s Website: Go to the website of the VPN provider you’ve chosen on your smartphone or computer.
- Select a Subscription Plan: Most VPN providers offer several subscription plans—monthly, yearly, or multi-year plans. Choose the one that best fits your needs. I recommend selecting a “Basic” plan since the VPN service is all you need.
- Create an Account: Enter your email address and create a password to sign up.
- Complete Payment: Choose your preferred payment method and complete the subscription process.
Once you’ve created an account, you can move on to downloading the VPN app on your vSeeBox.
Step 3: Access Google Play on Your vSeeBox to Download VPN
Now that you’ve signed up for a VPN account, it’s time to download the app onto your vSeeBox Here’s how:
- Turn on your vSeeBox and make sure it’s connected to the internet.
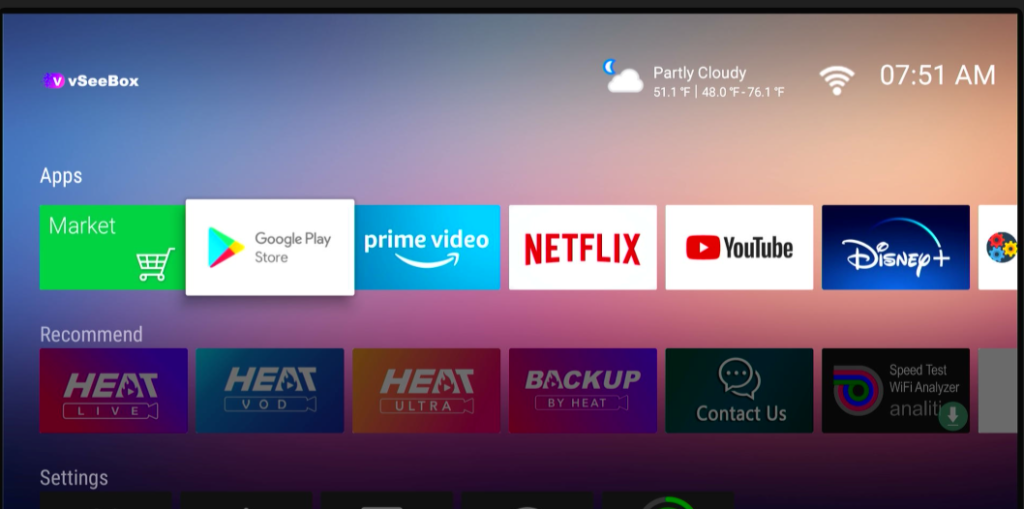
- Navigate to the Google Play Store App: Using your remote, go to the home screen of your vSeebox and open the Google Play Store app. See below.
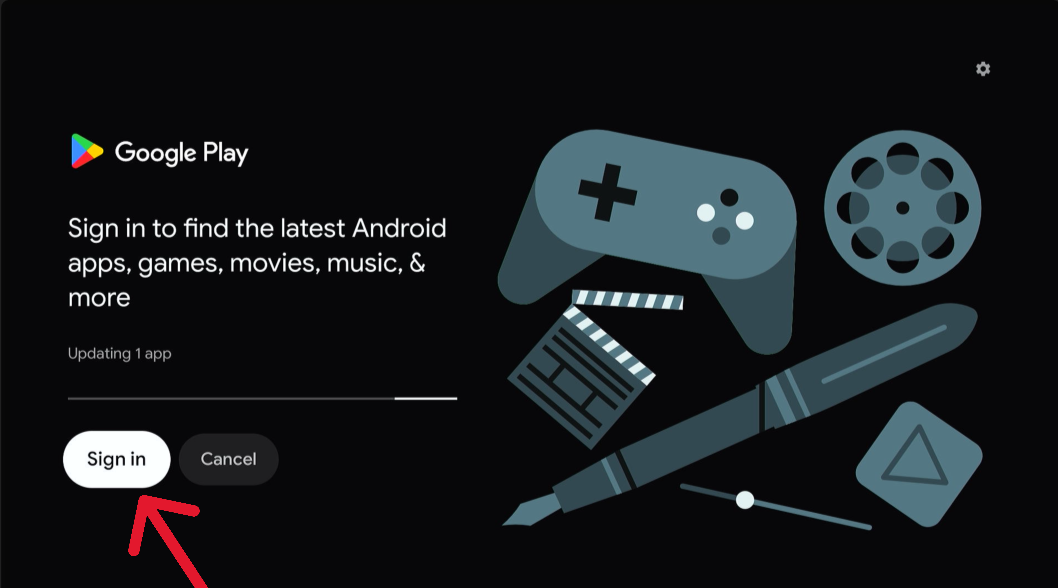
3. Sign in with your Google Account if you have a Gmail/Google account you can use it to log in. If you don’t already have a Google account, you will need to sign-up for one HERE.
Step 4: Search for the VPN App
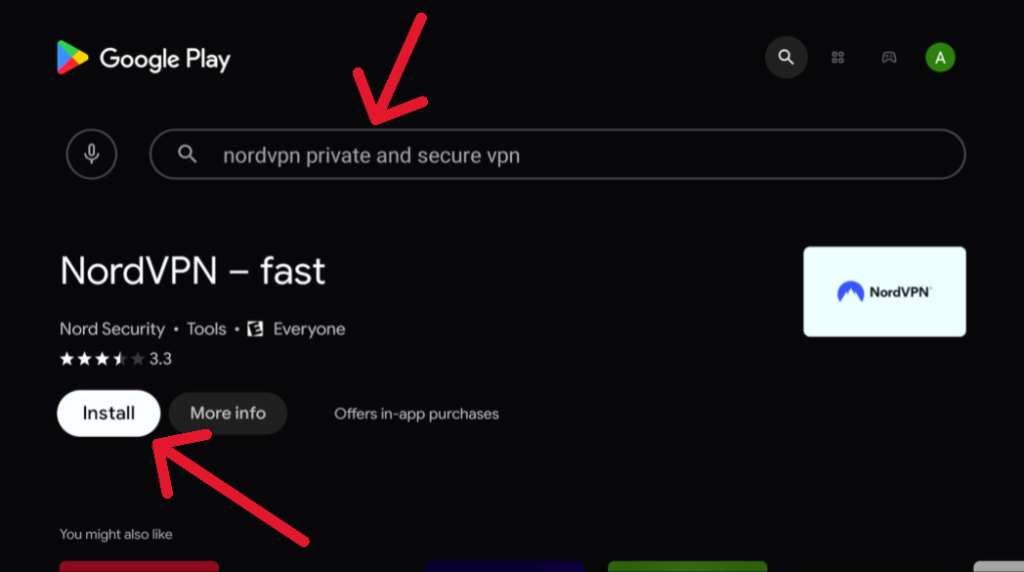
- In the Google Play Store search bar, type the name of your VPN provider (e.g., “NordVPN,” “Surfshark,” etc.)
- Once the search results appear, look for the official app of the VPN provider and click “Install”.
Step 5: Logging in to VPN
- The VPN app will start downloading and automatically install on your vSeeBox.
- Once installed, you’ll see the “Open” button. Click “Open” to launch the app. It will also appear on your home screen like below.
- Enter in your Username and Password that you setup in Step 2

Step 7: Navigating the VPN App
Once you’re logged in, you will have some different options. Below is an example from Nordshark’s, Home screen.

- Status – This provides a status update to show if you are properly connected to the VPN.
- “Turn On” – If you select this, you will automatically connect to the VPN service.
- Settings – This will be used in the following step and will be important for the next step.
Step 8: Setup your VPN Service to Automatically connect
Once you have a VPN service, you can configure it to automatically connect EVERY time you turn on your vSeeBox. This avoids you having to manually turn it on every single time!! HIGHLY RECCOMMENDED!
In Nord VPN:
- Select the “Settings” widget
- Once on the Settings page, select the “Auto-Connect” Option
- Confirm that you would like to turn on “Auto-Connect”

Step 8: Enjoy Secure Browsing and Streaming
Now that your VPN is set up and connected, you can enjoy all the benefits it offers. Your data is now encrypted, your location is hidden, and you have access to geo-restricted content, all while using your VseeBoX!
Happy streaming!